
Even though the “rules” for training when cutting aren’t as clearly defined as they are for nutrition. There are still a few principles that any workout routine must be based around if you want to see great fat loss results. In this guide you’ll learn what these principles are.
So, how to train when cutting? When cutting you’re eating fewer calories, which means you’ll have a lowered potential to recover. This means that you must set up your training in a way that allow you to recover. You do this by keeping your training volume on the low end and training intensity on the high end.
In this guide you’ll learn about the importance of recovery, how to set up a successful weight training cutting routine based on three pillars, and finally you’ll learn how to set your cardio correctly when cutting.
Table of Contents
Defining Cutting
Before jumping in on the main content of this post, I first want to make one thing clear. Which is the definition of cutting.
The definition of cutting is this:
- Losing body fat
- Maintaining or gaining muscle mass
As you can see, the goal of a cutting phase is to lose body fat, while maintaining or even building muscle mass.
In other words, cutting is the process of improving your body composition. And to accomplish this, you need to have a well set up training program.
Now, in order to understand how you should set up your training program to effectively create a better-looking body composition. You must first know the purpose of these two very different tissues:
What Are Body Fat?
Body fat are stored as something called triglycerides inside adipose tissue within our bodies.
And triglycerides can be released in the bloodstream to provide the body with energy when needed.
Why Do We Carry Body Fat?
Our fat cells are capable of storing extremely large amounts of triglycerides. This is so that we have energy readily available if/when there’s less food coming in.
A great way to think of your fat storage, is as an energy buffer:
When there’s absence of food, your body can turn to your fat storage to receive energy. And this is also what a calorie deficit means, i.e less food coming in, which is forcing your body to use its stored energy as fuel. Which results in fat loss.
What Is Muscle?
Muscle are, as opposed to fat, a biologically active tissue. This means that muscles are not there to provide the body with energy, but to perform some sort of physical task.
Essentially, muscles get developed by different growth factors forging together amino acids (proteins) and turning these into a functional contractile tissue.
Why Do We Carry Muscle?
There are three types of muscle that we carry:
- Skeletal muscle – This is voluntary muscle, that we can control ourselves, in order to move around and maintain posture etc.
- Smooth muscle – This is involuntary muscle, meaning muscles that we can’t control ourselves. This type of muscle is typically found within the walls of different organs and other structures.
- Cardiac muscle – Just as it sounds, this is a muscle found in the heart. It’s also a involuntary muscle, but is more akin in structure to skeletal muscle.
Out of these three, the muscle that you are likely most interested in are number one, skeletal muscle. As this is the tissues you want to increase in size to get that muscular physique going.
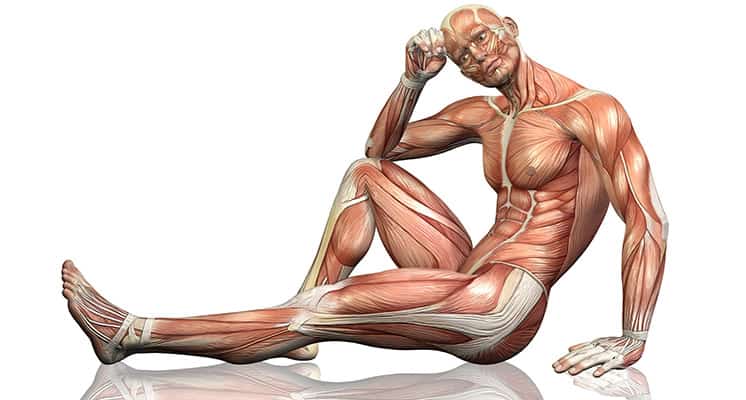
Skeletal muscle anatomy
How Do Skeletal Muscle Grow?
Muscle growth is achieved when muscle protein build up (also known as muscle protein synthesis) is larger than the muscle protein breakdown.
And this is mainly achieved by three things, and in this hierarchy of importance:
- Challenging resistance training
- Enough energy available to fuel the building process
- A high enough protein intake
Now you might be thinking:
Okay cool, but what does this have to do with me setting up my training program when cutting?
Well, a lot.
Because by knowing how fat loss and muscle growth takes place, you’re ready to learn how to set up the most effective training program, a program that will balance challenging resistance training with a calorie deficit. So, that you’re not just losing weight, but actually preserving or even building muscle while you’re effectively losing body fat.
The Three Weight Training Pillars For Optimal Fat Loss
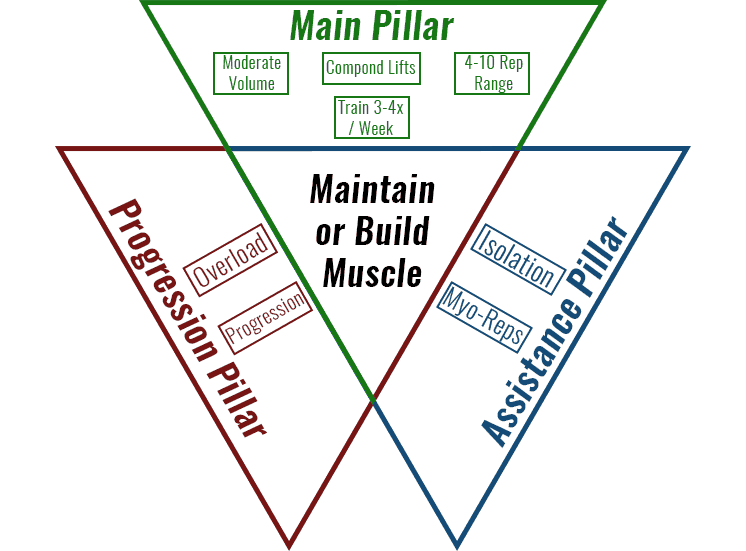
I’ve come up with three lifting pillars that will ensure you’re getting the best results possible while cutting, without having to give up on living in the process. These three pillars are:
- The main pillar
- The assistance pillar
- The progression pillar
If you want to do a successful cut, then you want to base your weight training around these three pillars.
How I Came Up With These Weight Training Pillars
Throughout my fitness journey so far, I’ve tried a few different training routines while cutting down to a low body fat percentage.
I’ve done high volume routines, that utilizes high rep training and focuses solely on the pump.
I’ve done powerlifting style routines that focuses mostly on very low repetitions with heavy weights.
And in my earliest days I even tried “muscle confusion” routines where my goal was to change exercises each workout in order to “confuse” my body.
The results?
Well, not only did I end up losing muscle on these routines… they were also hard to recover from and most of them didn’t allow for an enjoyable lifestyle.
It wasn’t until one day when I put the term “how to build muscle naturally” in the google search bar that I began to find out what actually works for us natural trainees.
I read everything I could find from websites like stronglifts, muscle for life, kinobody, think eat lift and stronger by science etc. The information was so refreshing as it didn’t portray the same old garbage I was used to, bullshit like:
“Use this 8 week god on earth program to get shredded”, or
“Eat this nitrogen buffered whey protein to reveal ripped muscles in less than 6 weeks”
By reading solid information which was based on science, I got extremely interested in learning the ins and outs of building a great looking physique as a natural trainee. So much that I started to look into the science behind training (and dieting) for fat loss and muscle growth myself.
And that’s when my physique really started to take off as well. All while I at the same time was able to spend less time in the gym, more time enjoying life, and feeling better in the process.
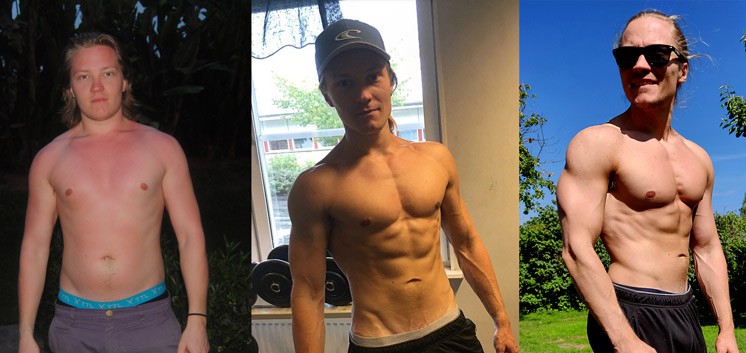
This is a picture of my 4-year progress.
Okay, so now that you’ve heard a bit of my backstory, let’s look at the step-by-step process to setting up your training program when cutting in the most effective and enjoyable way possible, starting with:
The Main Pillar
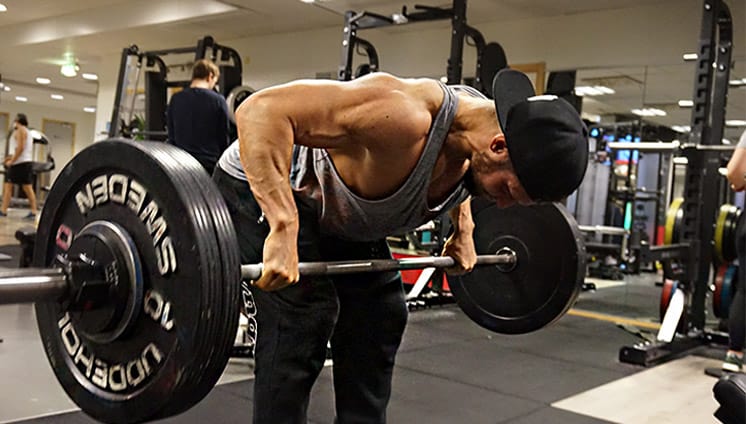
To build a lean, muscular and aesthetic looking physique as effectively as possible, you should focus your energy on getting insanely strong on just a handful of lifts. And that’s exactly what the main pillar is all about.
In this pillar all the fluff is cut out, meaning no time will be spent doing junk volume on unnecessary exercises.
This is first and foremost so that you’re able to recover from your training while you’re stripping of the body fat.
Because, here’s the thing:
A calorie deficit, which is required for fat loss, is also a recovery deficit. And if you’re not able to recover when cutting, then it’s bye bye to both strength and muscle mass. Both which are things I’m sure you want to avoid!
Secondly, the fluff is removed so that you can save time and energy towards enjoying your physique outside of the gym as well. I strongly believe that building a great looking physique should add value to your life and not the other way around. Unless you’re looking to compete in bodybuilding, why else would you even build it? So, train minimalistically!
So with that said, let’s get started with…
Step #1 – Setting Up Your Compound Lifts
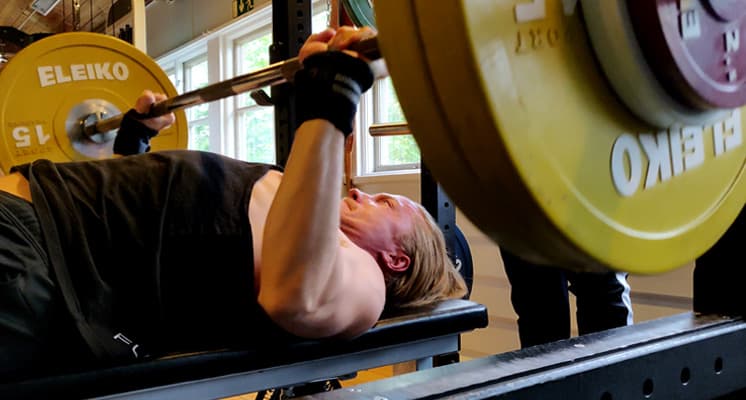
It’s been shown repeatedly that nothing beats the effectiveness of doing compound lifts for strength and physique development.
Here’s why:
- You can lift the most amount of weight with compound lifts
- Compound lifts stresses the whole body as one
- By doing compound lifts you use a range of motion that’s very natural to the body.
By doing heavy bench presses, overhead presses, pull-ups, rows, deadlifts and squats you will stress your whole body as one and in doing so get the largest stimulus for growth.
Doing tons of smaller isolation exercises, like flyes, front raises and facepulls etc. will only serve as “junk volume”. Meaning that if you rely solely on isolation exercises, then you would still see results, just less of it and for a lot more effort and time invested.
That’s not all… Even doing too much isolation exercises after your big compound lifts might be negative.
Why?
Because you’ll likely do too much volume for no reason, which will leave you unable to effectively recover. And remember, being able to recovery is the most important factor if you want to keep your muscle while dieting for fat loss.
Another important reason for utilizing big compound exercises is to create a symmetrical and proportional physique. As I’ve already mentioned, by doing large compound lifts, you’ll develop your body as one, and this is crucial for creating a great looking physique.
Way too many people, especially beginners, believe that to build big arms, or a big back, or a big chest, you just have to focus on those muscle groups with isolation exercises. But unfortunately that won’t work very well.
Why is that?
Well, let me answer that with a question:
Have you ever seen someone with huge 18-inch arms that has a small upper body? Someone who looks like this:

At least I haven’t.
In fact, everything is big on the guy with 18-inch arms. His back, chest, shoulders and even legs are going to be very well developed. He will look something like this:

You see, getting strong on big compound lifts makes your whole body bigger, including any specific muscles you want to grow as well. With that said though, there are still a time and place for isolation exercises, and we’ll cover when this is later in the guide.
But before doing so, let’s first take a look at the compound lifts that will best sculpt a great looking symmetrical and proportional physique:
The 7 Compound Lifts For Building a Symmetrical & Proportional Physique
The most important lifts that I always recommend are the big four, or at least close variations to them, and these are:
- Bench Press
- Overhead Press (Barbell or Dumbbell)
- Squats
- Deadlifts (Regular, Sumo or Romanian)
These are the lifts that will drive the growth of your entire body the most.
Once you got these covered, you should also use a few compound exercises that’ll build your proportions up as well, and these are:
- Pull-ups (Weighed)
- Rows (Barbell, Cable etc)
- Incline Bench Press (Barbell or Dumbbell)
These 7 exercises are all you need to create an outstanding physique, except for a few isolation exercises that we’ll cover under pillar 2.
But, before looking at those, let’s move on to…
Step #2 – Dialing in Your Training Volume
The main driver behind muscle growth is training volume (the amount of work that you do). Meaning, the more work you can do, while still being able to recover, the more muscle you will grow.
Now, with that said, since your goal during a cutting phase is fat loss, you must make sure that you’re not training too much. And this is very important.
Because here’s the deal:
Do you remember back in the intro of this post, when I explained that I did a high-volume routine during one of my cutting phases? The one where I used high sets and reps, with focus on the pump.
Now, that was a big mistake!
Why?
Because I violated something called the work to recovery ratio:
How Muscle Grow – The Work to Recovery Ratio:
In order to build muscle (or preserve muscle when cutting) you must first provide the stimulus for growth. Which is done via challenging training.
After that you must recover. This is where your body repairs itself from the stress and damage inflicted by the challenging training. Which is done with rest, food and sleep. When these two are balanced out with each other, that’s when you preserve or even build your muscle mass.
Now, what happened to me when I did the high-volume routine, was that my “work part” far exceeded my “recovery part” and hence that I lost muscle. (Not to mention, I also felt like shit). So, why did this happen?
Well, because I trained too much when my recovery capacity was greatly reduced by being in a calorie deficit.
So, the question becomes:
How do you get the best results from training while still being able to recover? Well, you set up your training to do the least amount of volume you can get away with while still keeping your strength.
Let me explain:
Making the gains in the first place is a lot harder than keeping them once you’ve got them. For example, let’s say you needed 10 sets of effective chest work per week to grow your chest, but to maintain that muscle you only need 5 sets.
So, reducing volume a bit will ensure that you recover throughout your cutting phase. Which means you will also spare your hard-earned muscle mass.
How Much Training to Do?
To preserve muscle mass some research and anecdotal evidence shows that for most people, training with only 6 effective sets per body part per week, is enough to maintain your current level of muscularity.
With that said, during some circumstances, it’s possible to gain a bit of muscle during a cutting phase, especially in the beginning. That’s why doing a bit more volume is favorable to start off with.
Here are the training volumes I recommend when cutting:
- 6-10 effective sets per muscle group per week
These recommendations refer to effective sets per week, so let’s look at that now…
Step #3 – Setting Up Your Repetitions
When cutting it’s very important that you get the most bang for your buck. This is so that you can get the most amount of effective work in and still recover.
Let’s look at how to do that:
There are three main factors that leads to muscle growth:
- Mechanical tension (tension on the muscles created by lifting heavy weights with low to moderate reps)
- Metabolic fatigue (the burn you feel when doing high reps)
- Muscle damage (how much you break down your muscles during training)
So, both pumping your muscles and lifting heavy weights will both lead to muscle growth. But they won’t do so equally.
It turns out that progressing mechanical tension over time, is by far the most important factor for muscle growth. And this tells us that, if you’re not getting stronger over time, you won’t grow bigger muscles very effectively either.
You’ve probably experienced this yourself, where if you’re as strong as you were last year, you’re probably the same size too.
Now, what’s worth mentioning is that, strength and size is correlated only when strength is gained in a medium rep range.
For example: powerlifters and Olympic weightlifters train their nervous system to produce high amounts of force for one rep. They also use form that gives them the best mechanical advantage.
That’s why individuals who aren’t that big and muscular, can still lift extremely heavy weights. Like how Lu Xiaojun back squatting 600 lbs (275 kg) at a bodyweight of 77 kg:
To get the most effective stimulus for muscle growth I recommend training in the:
- 4-10 repetition range on your compound lifts
Training within the 4-10 repetition range on your compound exercises is perfect when it comes to maximizing muscle growth during a cutting phase.
By training with 4-10 reps you’ll achieve the greatest balance between effectively getting in enough training volume, while also working with heavy enough weights to maximize mechanical tension on the muscles.
Training with weights that are medium to heavy will stimulates more mechanical tension (stretching and contracting under load) than metabolic fatigue (the pump) and this is highly beneficial when cutting. The reason for this is that training with more mechanical tension is less overall fatiguing and energy demanding than what metabolic training is.
But now you might ask:
Isn’t metabolic fatiguing training good during a cut? Won’t energy demanding lifting that causes metabolic fatigue help me burn more fat?
Truth is, yes it would…
But here’s the deal:
Your calorie deficit should mainly come from the diet and not from the training. Putting to much recovery demanding stress from training on your body when it’s already at a lowered ability to recover, won’t be sustainable long-term. As the risk of muscle loss and other stress related problems will be a lot larger.
Again, to get great, long-lasting results from your cutting phases you must be able to recover, and this is much easier done in a medium repetition range with medium to heavy weights, than what it is with higher repetitions and lighter weights.
That’s not all… What makes the 4-10 rep range so great is that it’s not too heavy either. If you were to train with lower reps than 4, you would need to do more sets with more weight to reach the same volume threshold to give a good enough stimulus for muscle growth.
This is in many cases not sustainable either, since a lot of sets with very heavy weights is more demanding on your joints, ligaments and central nervous system, rather than on your muscles. In fact, Greg Nuckols put it perfectly in his article The “Hypertrophy Range” – Fact or Fiction?:
Finally, the 4-10 rep range is also the easiest to make progressive overload in (making your training harder over time), and there’s two reason for that:
- It’s very easy to keep track of your workouts and weights, because you can typically make larger leaps in weight which are easier to track, and tracking is key behind successful progressive overload.
- Lots of people find it more enjoyable moving heavier rather than lighter weights. And enjoyment to training should definitely not be taken for granted, as it’s been shown repeatedly that aroused lifting causes more gains than merely going through the motion in the gym.
As you can see working in the 4-10 rep range comes with a bunch of advantages, and if you haven’t trained much in this rep range before, be ready to experience a lot of strength gains followed by new muscle mass once you get started.
What About Rest?
Okay, so the rest times for your compound exercises will be 3-5 minutes.
There’s a range so that you can take the rest you need to be recovered enough to perform the best you can again on your next set.
If you need 3 minutes, take 3 minutes, if you need 5 minutes, take 5 minutes. Typically, 5 minutes is the top though, very few but the absolute elite individuals when it comes to strength training require more than 5 minutes of rest between exercises.
Step #4 – Train 3-4 Times Per Week
There are three reasons why training 3, max 4 days per week are beneficial:
- Recovery
- Optimal Muscle group frequency
- Time for enjoying life
Let’s start with…
Number 1 – Recovery
When it comes to building muscle as a natural trainee, meaning no external help from sources like; anabolic steroids or anti catabolics etc. Then as I mentioned earier, the thing that will make or break your physique will be your work to rest ratio, and that’s the first reason why training only 3-4 days per week is very smart when cutting.
Here’s why:
Since you need to be in a calorie deficit to lose body fat, you can’t provide the body with food to recover better, instead what you can do is give the body a lot of days where it’s completely free from training (breakdown), where it can better recuperate itself even when there’s some absence of food.
Number 2 – Muscle Group Frequency
When it comes to building muscle naturally, to get the best results possible you need to optimize your muscle group training frequency.
This scientific review clearly shows that for a natural trainee, spreading out your total training volume (the amount of training you do) on 2-3 days throughout the week is superior to doing all the work only once per week.
Here’s why:
1. More frequent elevation of muscle protein synthesis (MPS) by training a muscle 2-3 times per week
MPS is the system in your body that synthesizes new proteins in your muscles, as the old ones has been broken down through training, and accordingly to research this rebuilding process goes on for 24-72 hours depending on your training experience.
*Younger trainees have a longer MPS duration, and vice versa for more experienced
When your body has been through one of these 24-72-hour cycles, that’s when you’ve made all your possible gains from that specific workout.
This essentially means that as a beginner to intermediate trainee, you have the opportunity to stimulate your MPS two times per week. Meaning that you can get two of these MPS cycles in, within the same week, which ultimately will result in more total growth. And as a more advanced trainee who recovers faster, then perhaps you can get greater results from 3-4 cycles per week.
2. More volume can be performed by spreading out the work over multiple sessions
First of all, research shows clearly that volume is the main driver of muscle growth, but not just any volume. Effective volume is what drives muscle growth.
To accumulate effective volume, it’s much better to spread out your work over multiple sessions. For example, doing 10 sets chest on 1 day per week will lead to less total effective volume performed than doing 5 sets chest on 2 days per week.
As you can see, it turns out to be the same weekly volume (10 sets), but the 2 day frequency will yield more effective volume, simply because you’ll be able to perform better if you do 5 sets on two separate workouts with a few days of complete rest in between, than what you would doing all of these 10 sets on one workout.
Number 3 – Time For Enjoying Life
As I said earlier, training and building muscle should add value to your life, and not steal from it. That’s a big reason why we keep training to only 3-4 days per week.
Now, if you absolutely LOVE training more than anything, then please go ahead and train more often. But, make sure that you take number 1 and 2 from above into consideration. So that you’re getting optimal results from the time invested.
And on that note, let’s look at:
Pillar #2 – The Assistance Lifting Pillar

The goal when setting up a training program for cutting is to utilize the easiest strategies and methods to create that ripped physique, as this will allow you to recover and feel great during your fat loss phase.
To achieve this, the best thing would be if you could only rely on The Main Lifting Pillar. But unfortunately, you wouldn’t get the best results using only that pillar. That’s why I created The Assistance Lifting pillar. Fortunately, though, I’ve found a method that makes this pillar very effective and enjoyable as well. So, let’s take a look at it.
Why We Need to Use Isolation & Assistance Exercises
The main reason why we need to use isolation and assistance exercises above only compound lifts, is because there’s one muscle group in particular that needs to be isolated in order to be trained, and this is your medial/side delts.
If you leave them underdeveloped, you will lose out on a huge part of what makes up an aesthetic physique. In fact, shoulder development is one of the biggest contributors of an overall aesthetic physique.
The crux with your medial delts is that they’re used in a very specific way that doesn’t let them get hit effectively by any of your compound lifts, not even overhead presses hit you medial delts well enough.
The only way to effectively train them is when you extend your arms out to the sides, like this:
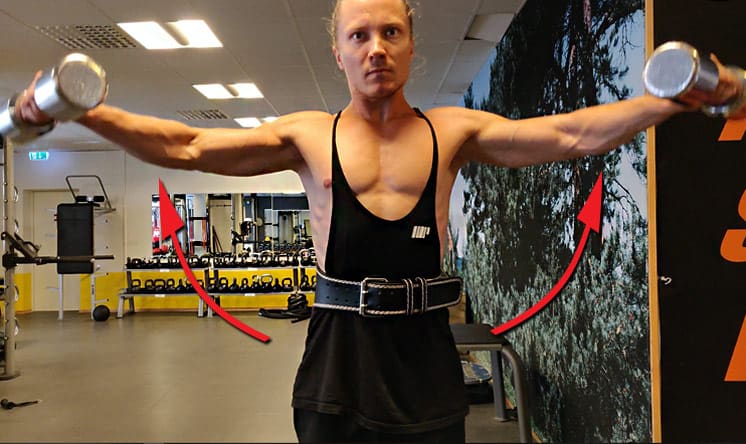
This movement puts your shoulders in a very bad positioning to lift heavy weights, risking injury. For that reason, you need to use lighter weights and higher reps to train your side delts safely and effectively.
Another reason for using isolation/assistance exercises are for certain muscle groups that need a bit more training to grow. This is typically biceps and rear delts, which are also huge components of an aesthetic physique.
A lot of people will get decent bicep and rear delt growth from compound lifts like pull-ups and rows. But to get very well-developed biceps and rear delts, these muscles typically require a bit more work. And if you were to do that extra work with more compound lifting, you would risk overtraining other muscles included in those lifts, such as the Lats, Rombs and Traps etc.
Another muscle group that should be trained with isolation exercises, are the one who people think are made in the kitchen, and yes, you guessed it, your abs!
Here’s the thing, abs are revealed in the kitchen, but just as with any other muscle, they’re made in the gym!
Now, heavy compound lifts will train your abs. But they’ll mainly train your internal, stabilizing abs, such as your transverse abdominis, and your internal obliques. In order to get that six pack to really pop when you’re lean, you must train your rectus abdominis directly, which is done with ab flexion exercises, such as crunches, and leg raises for example.
Finally, I believe that decently developed calves are highly aesthetical as well. So, for that reason I like to do some standing or seated calf raises in every leg workout.
Now, some people have very high calf muscle insertions and might not be genetically gifted enough to build their calves noticeably. However, I do think that you should at least give your calves a try to see how they respond.
Okay, so to effectively add this extra work for these muscles, I’ve found a technique that’s extremely effective, and it’s called:
Myo-Reps
Myo reps is the pet peeve of hypertrophy expert Borge Fagerli, and it’s amazing!
The main reason why I love myo-reps is because it’s a quick and highly effective method to get the work in. By utilizing Myo-reps you take advantage of rest periods to create a training stimulus that’s better than what you can achieve with a standard approach, it takes you around two thirds of the time, and it also leaves you with an incredible pump. Win, win, win!
I’ve written a complete guide about Myo-reps that you can read here. But in short, here’s how it works:
- Activation set: Start with a weight that you can get between 12-15 reps with. Then do as many reps as you can until you’re 1-2 repetitions away from failure.
- Rest 10-15 seconds
- Miniset 1: After the rest do another set until you’re 1-2 reps away from failure again.
- Rest another 10-15 seconds
- Miniset 2: After the rest do another set until you’re 1-2 reps away from failure again
- Rest another 10-15 seconds
- Miniset 3: After the rest do another set until you’re 1-2 reps away from failure again
- Repeat this process: Until you no longer can get the same amount of reps on all your minisets.
For example, let’s say you manage to do 12 reps on your first activation set, then you get 3 reps on your first miniset, 3 reps on your second, 3 reps on your third, but then only 2 reps on your fourth, that’s when you stop and are done with the exercise.
This way you will get an autoregulated effect from the training. Which means that if you’re more tired one day, then perhaps you’ll only get 4 minisets done, but on another day when you’re more fresch you might get 5 minisets done. 5 minisets is always the limit.
Make sure that you write down the reps that you get, so that you can make progress. In the example above you got 12+11 reps with this weight and exercise today, where the first 12 is from your activation set and the other 11 are from all your minisets, the goal is obviously to beat these reps during your upcoming workouts.
If you do 23 reps this workout and 4 workouts from now you do 33 reps with the same weight, then you can be sure that muscle growth has occurred.
Effective Reps – The Power of Myo-reps:
What makes Myo-reps so effective is the short rest times. By using extremely short rest between your sets you will instantly work with repetitions that’ll cause the most amount of muscle growth.
Here’s what I mean:
We know that the closer we come to failure, the more each rep will contribute to muscle growth.
*Failure being the point where the muscles involved in the exercise are so fatigued that they no longer can produce enough force to perform the exercise.
And there is a certain threshold you must pass in order for a rep to stimulate muscle growth. You can get these effective reps in any rep range, but according to research, the point where effective reps for muscle growth starts to accumulate seems to be at around 60% of max exertion.
Just think about it, if you were to do 12-15 reps the standard way, meaning with 2-3 min rest in between, then the first 7-8 reps of the exercise is going to be so easy that you’ll just go through the motion and not actually get any productive work from the time and movement invested.
Just as you can see in the picture below, when training with ligth weights for around 12-15+ reps, you will not get an effective stimulus until you reach rep #8:
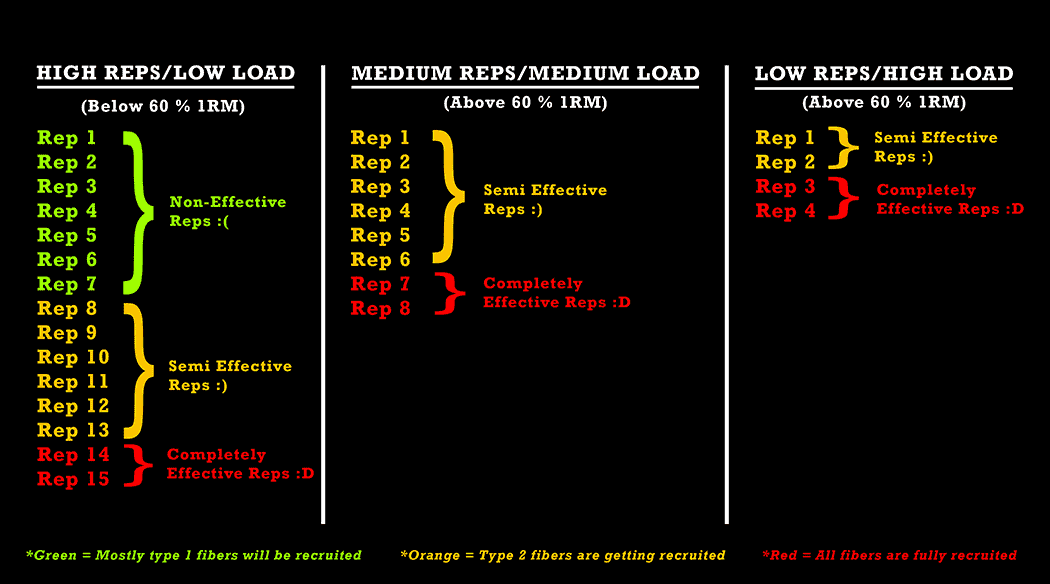
With Myo-reps on the other hand, each miniset that you do will be like starting on rep 8-10. This means that immediately from the first rep you do effective work that causes muscle growth.
Again, if you want a more in-depth explanation about Myo-reps check out this post.
What Isolation Exercises to Use?
Here are the exercises that you’ll use to make sure you’re developing your medial delts, rear delts, biceps, abs, and calves completely:
- Dumbbell Lateral Raises
- Rear Delt Dumbbell Flyes
- Dumbbell or Barbell Spider Curls
- Hanging Leg or Knee Raises
- Standing or Seated Calf Raises
This is all that you need to build a great looking physique. Spider curls is an exercise that in combination with heavy pull-ups and rows will cover all your bicep development.
You don’t have to do a hundred different exercises for your biceps, they will grow amazingly well by supplementing your compound pulls with just one isolation exercise like Spider curls.
I also recommend hanging leg or knee raises for ab development, simply because that exercise trains all your abs, both upper and lower very effectively. So you don’t have to do hundred different ab exercises either.
Okay so there we go, you’ve now gotten a good overlook of first two pillars of the training system. You’ve learned the most effective, easy and enjoyable steps you should take to get great results from your training. So, let’s look at the last and most important pillar of the entire training system, which is:
Pillar #3 – The Progression Pillar
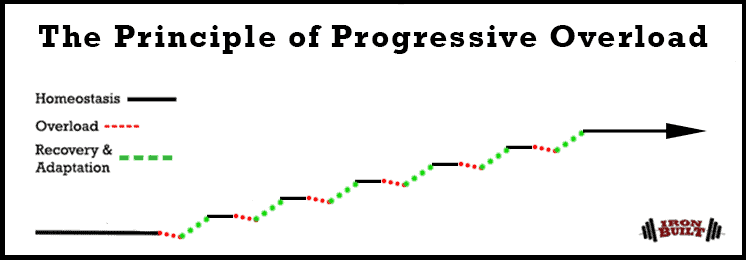
Except for a few optimalities when it comes to cutting that was found in The main pillar and The assistance pillar, most of the information covered under those two pillars are there to make your training as easy and enjoyable as possible, while also providing you with great results in the meantime.
The progression pillar on the other hand is a MUST, no matter how you choose to train. If you want to effectively build, or at least preserve muscle when cutting, you must try your best to progress your training and get stronger over time. This holds true even if you’re in a calorie deficit, where progression is harder to achieve!
Getting stronger over time is known as progressive overload and it’s ultimately what will build you that muscular physique that will drop peoples jaws when your shirt comes off. So, pay close attention to this part!
Why You Must Focus on Progressive Overload!
Typically, people only uses a training split or routine, but don’t care about progressive overload. And this is a big mistake…
Making sure that you get stronger over time is the most important aspect of the entire training program when it comes to transforming your physique.
Just think about it; if you can lift 100 lbs for sets of 6 today, and a year from now you still lift the same 100 lbs for sets of 6, then why would your body need any additional muscle?
On the other hand, if one year from now you lift 200 lbs for sets of 6, then your body had to get bigger for you to handle that.
So, the question becomes…
How to Make Progressive Overload?
*This video explains perfectly the concept of progressive overload and how to achieve it.
To get stronger over time all you have to do is just increase the weight on the bar and you’re on your road to a shredded physique, right?
Well, not so fast.
Increasing weight on the bar each workout while also being in a calorie deficit, will only be possible for complete beginners, who have a very sedentary lifestyle, and has never set their foot in the gym before.
If you’re a more experienced lifter, then some sort of more advanced training progression scheme rather than simply adding weight to the bar each workout, will be required to ensure that you increase your strength on a regular basis.
Double Progression – The Perfect Model for Beginner to Intermediate Trainees
My definition of a beginner to intermediate trainee are someone who’s within their first 0-4 years of solid strength training. And with solid I mean you’ve trained with compound lifts and tried to improve your lifting performance every time you’ve hit the gym so far.
If you’ve gone to the gym for 1 year already but have only trained with “easier” isolation exercises or not tried to push the weights hard in the gym, then you’re still considered a beginner.
Okay, so let’s look at double progression, the ideal progression model for a beginner to novice trainee.
Double progression is done by first increasing reps then increasing the weight when you reach the highest rep within a repetition range. Here’s a more exact outline of how to do double progression, which I’ve discussed more about in this post.
How to implement double progression with reps before load:
1. Instead of having a fixed repetition range of say 5 reps, you instead have a target rep range, let’s say 4-6 repetitions.
2. Use the same weight on the bar every session until you reach the high end of the rep range on all your sets, which would be 6 reps in this example.
3. The session after you’ve reached the high end of the rep range (6 reps) on all your sets, increase the weight on the bar by the smallest increment possible. This will likely have you lose a couple of reps per set. But that’s fine, your goal is to now add back these reps over your upcoming workouts.
4. Repeat this process until you no longer can increase weights without dipping below your rep range. So, if you increase weight and start getting 3 instead of 4 reps on your sets in this example, it’s time to change something.
5. If you start dipping below your target rep range using 4-6 reps for example, simply increase your working rep range to, 4-8 reps, once you plateau on that, increase the range again to 4-10 and so on.
Essentially what you’re doing is prolonging your time to progress in weight by getting an extra rep here and there. This is a very powerful strategy that will allow you to make progressive overload for a long time
And here’s an example of double progression in action:
Let’s say you did bench press and it went like this:
- Set 1: 180 lbs – 6 reps
- Set 2: 180 lbs – 5 reps
- Set 3: 180 lbs – 4 reps
You hit 6 reps on your first set, but then you only manage 5 reps on your second set, and only 4 reps on your third set.
Now, your goal for the next time you do bench press is to try and get more reps. As that day comes, it goes something like this:
- Set 1: 180 lbs – 6 reps
- Set 2: 180 lbs – 6 reps
- Set 3: 180 lbs – 5 reps
Awesome, you added 2 reps to your bench press, sure you didn’t get 6 reps on all your sets. But you should still view this as a very successful workout, because it’s still progressive overload!
Great, you go home, you eat and rest. Then as you come back to your next bench press workout, the following happens:
- Set 1: 180 lbs – 6 reps
- Set 2: 180 lbs – 6 reps
- Set 3: 180 lbs – 6 reps (even felt easy!)
And then the next bench press workout after that…
- Set 1: 185 lbs – 5 reps
- Set 2: 185 lbs – 4 reps
- Set 3: 185 lbs – 4 reps
You increased the weights, and dropped a few reps, which is completely fine. You now have the goal to add back these reps over your upcoming workouts again.
If you train like this by focusing on adding reps each time you hit the gym, your fat loss results will be A TON better than what they would if you just haphazardly move some weights in the gym.
Okay, so there you have it, the three pillars required for setting up a successful weight training routine when cutting. To sum it all up, here’s a great sample program built on these principles in mind.
Sample Training Program
Workout A – Upper Body
| Exercise | Sets | Reps |
|---|---|---|
| Barbell Bench Press
Barbell Bent-Over Rows Incline Dumbbell Bench Press Dumbbell/Barbell Spider Curls Lateral Dumbbell Raises |
3
3 3 3-5 3-5 |
4-10
4-10 4-10 12-15 Myo 12-15 Myo |
Workout B – Lower Body
| Exercise | Sets | Reps |
|---|---|---|
| Barbell Back Squats
Romanian Deadlifts Standing Calf Raises Hanging Leg/Knee Raises Rear Delt Dumbbell Flyes |
3
3 3-5 3-5 3-5 |
4-10
6-10 12-15 Myo 12-15 Myo 12-15 Myo |
Workout C – Upper Body
| Exercise | Sets | Reps |
|---|---|---|
| Pull-ups
Overhead Press Seated Cable Rows Flat Dumbbell Bench Press Dumbbell/Barbell Spider Curls Lateral Dumbbell Raises |
3
3 3 3 3-5 3-5 |
4-10
4-10 4-10 4-10 12-15 Myo 12-15 Myo |
Workout D – Lower Body
| Exercise | Sets | Reps |
|---|---|---|
| Regular Deadlifts
Leg Press Standing Calf Raises Hanging Leg/Knee Raises Rear Delt Dumbbell Flyes |
3
3 3-5 3-5 3-5 |
4-10
4-10 12-15 Myo 12-15 Myo 12-15 Myo |
This is a 4-day balanced upper/lower routine. If you want to train less legs, you can remove the last leg workout and add a bit of that training volume to your one remaining leg workout instead.
If you want to learn more about which routine or split to train with, check out this post.
How to Set Your Cardio Training When Cutting

Before finishing up this guide, there’s one more thing we need to cover, which is cardio.
Usually people think the following; “since it’s cutting time, it’s cardio time.” But this thinking is a bit misleading, because the fact is that when cutting you should try your best to minimize your cardio.
The reason for this is that most types of cardio is highly stressful to the body. With that said though, cardio can still be very helpful for calorie burn, but it needs to be controlled and done moderately for it to be effective.
A good recommendation is to let your diet stand for 80% of your calorie deficit and cardio only 20%. By doing this you will make sure that you’re not bumping into recovery problems and start losing muscle mass.
To avoid making this into a book rather than a blog post, I recommend that you read about cardio when cutting here. In that post you’ll learn exactly how much, what types, and when you should do your cardio when cutting.
What’s Next?
Okay so there we go. You’re now equipped with what I believe to be hands down the best training system that you can use during a cut. It sure has suited me well over my last few cutting phases.
Now, if you’re unsure about where to take it from here, or if you simply want more meat on your bones before starting your own cut, then I recommend following The ShredSmart Program.
The ShredSmart Program is a fat loss and muscle building course created by Radu Antoniu. In the course you’ll learn exactly how to set up your cutting phase depending on your starting point and also how much strength you must build to reach the physique of your goals (and so much more!)
You can learn more about the program here.

Wonderully put. Purely excellent. Well done sir, and thank you
Thanks man! Glad you liked it 🙂
By far one of the most informative articles I have read on this subject. Thank you so much for this!
I wanted to make sure I understood the concept of double progression correctly. As recommended, the compound lifts in the sample program provided are in the rep range 4-10. So, as per the double progression guideline,
– I would begin with the rep range at 4-6, and follow the double progression method to reach rep 10 eventually (as you mentioned in the example above)?
Thank you, glad you liked it! 🙂
I recommend that people start out with a rep range that is in between 2 reps, so for example 4-6 and try their best to make progress within that rep range by increasing weight each time they hit the upper range (this will lead to the quickest progress).
Once a plateau happen, when you can no longer increase weight once you reach in this example 6 reps on all your sets, that’s when you make the rep range larger, by increasing it to between 4-8 reps and then once you plateau at 8 reps on all your sets you increase the range to 10 reps. The reason why I found this to be the best way is that it’s MUCH easier to simply add 1 rep on one or on multiple of your sets the next workout than to increase 5 pounds in weight. It simply becomes a slowed down progression model (but not to slow), which is required once an individual becomes more advanced